How to setup a trail camera (Step-by-step-guide)
Introduction
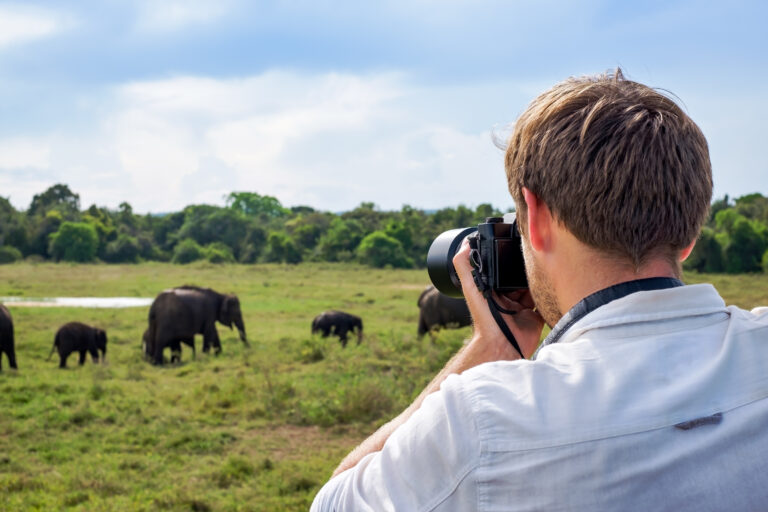
Setting up a trail camera is easier than you might think, and it’s the key to unlocking a hidden world of wildlife activity! Whether you’re a beginner eager to see what walks through your backyard at night or an advanced wildlife enthusiast scouting game trails, this guide will walk you through how to set up a trail camera step by step. Trail cameras (also known as game cameras or wildlife cameras) are motion-activated devices that let you photograph or video animals in their natural habitat without disturbing them. With thousands of people searching for this topic each month, you’re in good company – and by following these tips, you’ll be on your way to capturing stunning wildlife moments of your own.
In this article, we’ll cover everything from picking the right location and angle to securing your camera and optimizing its settings. We’ve also included pro tips on avoiding common mistakes (like empty photos of moving leaves) and some product recommendations. By the end, you’ll have a trail cam set up that’s primed to catch all the action, whether it’s a majestic deer at a watering hole or a curious fox on the prowl. Let’s dive in!
Table of Contents
Our Recommended Trail Cameras for Beginners
Looking for a budget-friendly trail camera that still delivers solid results in the wild? The Bushnell Prime 24MP Low Glow Trail Camera is a fantastic entry-level option trusted by hunters, researchers, and wildlife enthusiasts alike.
🔍 Key Features:
24 Megapixel Photos – Crisp, clear images of wildlife even at a distance
Low-Glow Infrared Flash – Captures night-time shots without scaring off animals
0.3-Second Trigger Speed – Fast enough to catch animals in action
Weather-Resistant Build – Designed to withstand the elements in any season
Adjustable Settings – Easy to configure for both beginners and advanced users
Want maximum stealth and image clarity deep in the wild? The Bushnell CORE No Glow Trail Camera delivers high-end performance for serious wildlife monitoring — all without alerting animals to its presence.
🔍 Key Features:
30 Megapixel Photos – Stunning resolution for detailed captures
No-Glow Infrared Flash – Invisible to animals, perfect for undetected night shots
0.2-Second Trigger Speed – Incredibly fast to catch even quick-moving animals
1080p Full HD Video – Records crisp motion with audio support
Long Battery Life – Up to 12 months in the field with lithium AAs
Just getting started or need an affordable backup cam? The WOSODA 24MP Trail Camera is an excellent low-cost option for beginners and backyard wildlife watchers.
🔍 Key Features:
24MP Photos & 1080p Video – Solid quality for the price
0.3-Second Trigger Speed – Quick enough for most wildlife encounters
120° Wide Angle Lens – Covers more area in each shot
Low-Glow Infrared Night Vision – Quiet and subtle in the dark
IP66 Waterproof Design – Weatherproof and durable for all seasons
Want instant updates sent straight to your phone? The Moultrie Edge Cellular Trail Camera combines solid image quality with advanced LTE connectivity, making it perfect for remote wildlife observation or property monitoring.
🔍 Key Features:
Built-In LTE Cellular Module – Sends photos directly to your phone via app
No SD Card Required – Uses internal storage + cloud syncing
High-Quality Photos (33MP) – Crisp details day and night
Auto Connect to Strongest Signal (AT&T or Verizon) – No SIM swapping needed
Easy App Control – Set up, adjust, and view from anywhere

Step-by-Step: How to Set Up a Trail Camera
Setting up your trail camera involves a bit of preparation and a strategic approach in the field. Follow these steps to ensure your trail cam is positioned for success:
Step 1: Gather Your Gear and Prep the Camera
Before heading out, make sure you have everything you need and that your camera is ready to go. Proper preparation at home will save you a lot of hassle in the field Here’s what to do:
Insert Batteries: Use fresh batteries (or charge the built-in battery pack) as recommended by the manufacturer. Many trail cams use AA batteries – load them up and double-check they’re installed correctly. Some models can take up to 8× AA batteries and claim to last months in the field (even 6–12 months) on one set Lithium batteries or an external 12V battery pack/solar panel can offer longer life if your camera supports them.
Insert and Format the SD Card: Choose a high-capacity, fast SD card (32GB or 64GB is typically plenty) and insert it into the camera. It’s smart to carry a spare SD card for each camera This way, when you check the camera, you can swap cards on the spot without missing any action. Always format the card in the camera (using the camera’s menu) if that option is available – this ensures it’s ready to record properly.
Set Date and Time: Power on the camera and navigate the menu to set the correct date and time. This step is crucial so that each photo or video is timestamped accurately – you’ll know exactly when that cheeky raccoon wandered by at 2 AM. If your camera has more advanced time stamp settings (like moon phase or temperature), configure those as needed.
Configure Basic Settings: While you have the camera on, choose your desired mode (photo, video, or both). For beginners, starting with photo mode (or photo + short video) is a good idea. Set the image resolution to a medium or high setting (higher gives more detail but uses more memory). If using video, you might select a 10–30 second clip length. Also, set the capture interval (the delay between triggers) – for example, a 30-second delay to prevent too many identical shots. We’ll fine-tune other settings later, but these basics should be done upfront in a comfortable environment.
Pro Tip: Skim through the camera’s manual to understand its features. Every model is a bit different. Knowing how to navigate the menu or what icons mean will help a ton once you’re out in the field. Some modern trail cams even allow you to adjust settings via a phone app or have a live view, so take advantage of those if available.
Step 2: Choose the Perfect Location
The location of your trail camera can make or break your results. In fact, when it comes to capturing wildlife, it’s all about location – the goal is to place the camera where animals are likely to pass and where the camera can operate optimall. Here’s how to find a great spot:
Find Signs of Wildlife: Look for game trails, tracks, feeding areas, watering holes, or burrows/nests. Areas with visible animal activity (tracks, droppings, rub marks on trees) are prime candidates. If you’re targeting specific animals (e.g. deer or boar), setting up near their known routes or food sources will increase your chances of captures. Think like the animals: If I were a deer, where would I walk? This mindset helps in picking a spot where your subjects are already inclined to go.
Open View and Background: Choose a spot with a clear field of view. Avoid having too many obstructions like tall grass or branches directly in front of the camera lens, as these can trigger false alarms (motion sensors might mistake waving branches for animals). A bit of trimming is okay – clear away any vegetation within the camera’s detection zone (usually a few yards in front of it) that could move in the wind. Also, try to have a relatively uniform background (like foliage or a forest backdrop) behind the area where animals will be. This makes animals stand out more clearly in the photo and avoids issues like the camera focusing on a busy background.
Avoid Direct Sunlight Glare: Important: Never aim your trail camera directly east or west if you can help it. Facing it east means sunrise will glare into the lens; facing west means sunset glare. This can cause overexposed, white-out images during dawn/dusk when animals are active. Instead, the best direction to face a trail camera is generally north.(or south, if north isn’t practical). By facing north, you avoid the sun crossing into the camera’s view, preventing harsh backlighting or lens flare. If north-facing isn’t an option, just ensure the camera is in a shaded spot or angled such that the lens isn’t getting blasted by sunrise/sunset light.
Think About Camera Height: How high you mount the camera on the tree (or post) will affect your shots. A common recommendation is about 3 to 4 feet off the ground (roughly 1 to 1.2 meters) for deer-sized animals.Wildlife expert Tim Helin sets his cameras ~4 feet high, slightly above a deer’s eye level. This height often gives a good view of most medium-to-large animals. However, adjust based on target species: for birds or very small critters, you might go a bit lower; for monitoring humans (security or trespassers) you might go higher for a wider field of view. Remember, if you place it too high (like some hunters who mount at 6–7 feet and angle downward), you can cover more ground, but steep downward angles may distort how large animals appear. A level angle at animal height usually produces more natural images.
Stealth and Security: Pick a location where your camera can remain inconspicuous. Most trail cams come in camo colors to blend in. You can further hide it by attaching some small leafy branches around it (being careful not to obstruct the lens or sensors). Also consider security: unfortunately, trail cams can be targets for theft if found. So, choose a tree off the main human path if on public land, or somewhere not easily seen at eye level. Later we’ll discuss using a lock or security box, but for now, just be mindful to “hide” your camera as best as you can while still capturing the area of interest.
By scouting a bit and placing your camera thoughtfully, you dramatically increase the likelihood of capturing something amazing. Once you’ve identified the perfect tree or post and ensured a clear, well-oriented view, it’s time to mount the camera.
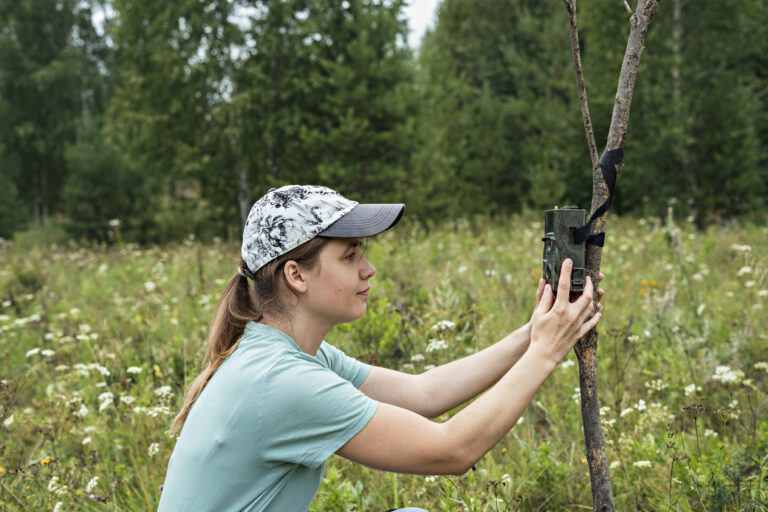
Step 3: Mount Your Camera Securely
Now that you have the spot, let’s get that camera mounted. Most trail cameras come with some mounting options, typically a strap that goes around a tree. The goal is to fix the camera in place firmly at the chosen height and angle.
Use the Provided Strap or Mount: Position the camera against the trunk of the tree (or on a fence post, etc.) about 3–4 feet high (or your chosen height from Step 2). Feed the fabric strap through the slots on the back of the camera, wrap it around the tree, and pull it tight. You want the camera to be stable with no wobble. If your camera came with a buckle, clamp it down so the strap is snug. For added stability on smaller trees, you can wedge a bit of bark or a stick behind the camera to prevent tilt. Some cameras also have a tripod screw mount or come with an optional mounting bracket or tree screw – use those if provided and if they allow a more secure fit. Just be cautious with screw-in mounts on live trees in sensitive areas (some parks forbid damaging trees).
Adjust the Angle: Aim the camera at the area you expect wildlife to pass. If the terrain slopes, you might need to angle the camera up or down slightly. Many trail cams have a little built-in bracket or you can improvise by tilting the camera and tightening the strap to hold that angle. A useful trick: bring a couple of small wedges (even a folded cardboard or a wedge of wood) to place behind the camera’s top or bottom to fine-tune the tilt. For example, if the camera is too high and pointing over animals, wedge the top forward to angle it down. You want the sensor to cover the zone where an animal’s body will move. Most motion sensors have a detection range somewhat matching the camera’s field of view, but check your manual for the exact coverage (usually a cone of ~45–60° from the lens). Adjust so the expected path is centered in that view.
Camouflage It: Take a step back – is the camera obvious to you? If it stands out, add camouflage. You can attach some leafy vegetation around it (without covering the lens or PIR sensor). Many cameras are already camo-patterned, but breaking up the outline helps. Also ensure no shiny parts are exposed – for example, if your camera has a shiny lock bracket, consider mudding it up or covering with tape. Remember, animals like deer can notice something new (and humans definitely can), so the more it blends into the tree, the better.
Lock It Down (Optional but Recommended): If your camera supports a padlock or Python cable lock, use it. Thread a cable lock through the camera’s lock holes and secure it around the tree. This prevents easy theft and also keeps raccoons or bears from easily knocking it around (yes, animals can be curious!). Some enthusiasts even use metal security boxes lag-bolted to the tree, in which the camera sits. Use these measures as needed, especially on public lands or areas with known human traffic. It’s better to be safe than sorry after investing in a good trail cam.
Take a moment to double-check the stability: the camera should not move if the tree is shaken lightly. Also confirm the angle by doing a quick test (more on testing in a moment). At this stage, your trail camera is mounted in place, loaded with batteries and card, and aimed properly. Now it’s time to configure the final settings in the field to match the environment.
Step 4: Adjust the Settings for Optimal Performance
With the camera mounted and aimed, you’ll want to fine-tune the settings to suit the location and your goals. Many of these settings you began in Step 1, but now you might tweak them based on the environment:
Motion Sensitivity: Trail cameras allow you to set the sensitivity of the PIR motion sensor (low/medium/high). In an open area with distant subjects, a high sensitivity can capture animals as soon as they enter the frame. In a busy area (thick brush or overhanging branches), high sensitivity might lead to false triggers (e.g., branches moving) In such spots, setting it to medium or low can filter out minor motions. As a rule of thumb, use higher sensitivity for open spaces or small animals, and lower for dense, windy areas to avoid 1000 pictures of an empty scene because leaves kept triggering the cam.
Trigger Mode & Frequency: Decide if you want single photos, multi-shot bursts, or video when motion is detected. For starters, a single photo or a burst of 2-3 photos per trigger is a good default. A burst can be helpful to capture multiple angles of a moving animal (for example, the first shot might catch it entering, the second fully centered). If you’re interested in videos, many cams let you do photo + video together (take a photo for easy viewing plus a follow-up video). Just remember videos chew through battery and card space faster. Also set the delay (interval) between triggers: delay is how long the camera waits after a trigger before it can detect motion again. A short delay (like 5 seconds) will capture more action but could give you lots of near-duplicates if an animal lingers. A longer delay (like 1 minute) might miss some action but saves space. For general wildlife monitoring, something like 10-30 seconds delay is often a good compromise. If on a feeding station or bait, you might go longer to avoid hundreds of images of the same animal feeding. If on a game trail, shorter delay catches animals following each other.
Image Quality and Video Settings: Set the resolution based on your needs and card capacity. Higher resolution (e.g., 20MP photos, 1080p or 4K video) yields better detail – great if you plan to print photos or need crisp footage. However, if your primary goal is just to identify what species came by, you can drop to a moderate resolution (8-12MP, 720p video) to save space and battery. Keep in mind, a 4K video looks amazing, but a 10-second 4K clip will consume much more memory and power than a 10-second 720p clip. Night mode: if your camera has adjustable flash settings (low glow vs. no glow, or flash power), you can set that too. “No glow” (invisible IR) is best for not disturbing animals, whereas low glow (a faint red light) might give slightly farther range. Most modern cams default to no-glow infrared for photos.
Time-Lapse or Schedule (Optional): Some advanced trail cams have time-lapse features or allow you to set active hours. For example, you can schedule the camera to only be active at dawn and dusk. Use this if it suits your needs (like avoiding daytime triggers if only interested in nocturnal activity). Time-lapse can take a photo every X minutes regardless of motion – cool for monitoring a whole field or landscape for activity, but you’ll sift through many images. If you enable time-lapse, the camera usually still takes motion triggers too. These features are optional – if you’re not sure, you can leave the camera on default motion-trigger mode 24/7, which covers all bases.
Double-Check Everything: Now, close the camera’s case securely. Make sure the latch is clicked and the unit is weather-sealed. Many trail cams have a small LCD or at least LED indicators. Arm the camera (usually by switching from “Setup” to “On” mode). You’ll often get a countdown (e.g., 30 seconds) before it becomes active. Watch that it flashes the correct lights indicating it’s armed. At this point, do a quick test – wave your hand in front of it or walk past; you might see an LED blink indicating it detected motion. (If there’s a screen, you might even get a live preview or you can take a test photo.) This will give you confidence that it’s actually working.
Pro Tip: If your trail cam is for security or property monitoring, make sure to turn off audio beeps or indicator lights in the settings (most have an option for “LED on/off”). You don’t want an intruder noticing a blinking light. For wildlife, lights/beeps are less of an issue, but quieter is generally better.
Your camera is now set with the optimal configurations. The final step is one many people skip – and regret skipping – which is to test the setup and make sure it’s positioned correctly before you leave the site.

Step 5: Test Your Trail Cam Setup
Before you walk away and let your camera do its thing for the next few days or weeks, do a quick field test. This step ensures you won’t come back to find empty frames or half an animal cut off in all your shots.
Walk-Test for Motion Detection: Most trail cams have a walk-test mode or at least an indicator light. Walk in front of your camera at various distances (start at, say, 10 feet away and move across the detection zone). The camera’s little LED should blink when it detects you (on many models). This confirms the sensor range and aim are good. Do a couple of passes at different distances and angles. If the camera isn’t picking you up until you’re very close, you may need to re-angle it or increase sensitivity. If it’s picking up far-off movements (you at the very edge of where you expect animals), that’s a good sign.
Take a Test Photo/Video: Trigger a test image – many cameras have a manual “take photo” button in setup mode, or simply arm it and walk through once. After it triggers, use the built-in screen (if available) to review the image. If there’s no screen, consider having a viewer or simply take the card out and check it on your phone/laptop (if you carried one). This might seem like overkill, but it lets you see exactly what the camera sees. Check: Is the target area well framed? Was the image clear and not washed out by sun? Is the angle good (not pointing too high or too low)? If something’s off – adjust now. For instance, if you only see your legs in the test photo, angle the camera up a bit. If the area is half sky (too high), angle down. This test can save an entire deployment from being wasted.
Final Adjustments: Make any needed tweaks to position, angle, or settings. Common last-minute fixes include trimming an extra branch that showed up in the test photo, or tilting the camera slightly more. If your camera has an aiming laser or screen, use it to perfectly center the zone.
Secure and Leave Quietly: Once satisfied, ensure the camera is re-armed (if you turned it off to check images) and the case is locked. Then quietly leave the area. It’s best to minimize your scent and disturbance now, especially if you’re in a hunting scenario or monitoring skittish wildlife like deer. Some experts even spray scent eliminator around the camera or wear gloves when handling it, so they don’t leave human scent that could spook animals. If you’ve been sweating or tramping around, consider giving the spot a rest – the animals might take a day to get used to the new object. After that, they’ll tend to ignore it, especially if it’s well camouflaged and scent-free.
Congratulations – your trail camera is all set up! Now, it’s a waiting game. Depending on your purpose, you might leave the camera out for a few nights, a week, or even a month or more. Trail cams today are quite good at weathering the elements, and with fresh batteries, many will operate for several weeks easily.
Bonus Tips for Trail Camera Success
By following the steps above, you’ve covered the basics of trail cam setup. Here are some additional tips and best practices (gleaned from experienced users and top-ranking blogs) to help you get the most out of your camera and avoid common pitfalls:
Minimize Your Scent and Impact: If you’re after deer or other scent-sensitive wildlife, take precautions to eliminate human scent. Handle the camera with clean gloves, avoid touching surrounding vegetation too much, and consider spraying a scent eliminator on and around the camera after setup. Leave the area promptly so your smell dissipates. The biggest reason animals might avoid a camera isn’t the camera itself – it’s the human scent left around it. During retrieval, do the same: approach quietly and as scent-free as possible.
Give It Time: As excited as you may be to see what you captured, resist the urge to check the camera too often. Constant visits can scare away the very animals you want to see. A good rule is to wait at least a week or two before checking, unless you have a specific reason (or you’re using a cellular cam that sends images to your phone). One expert notes he checks his cameras around every 3 weeks in the off-season, and even less frequently during sensitive times, to avoid disturbing the area. Patience pays off – you’ll get more natural activity if the site is left alone.
Use Two SD Cards Per Camera: As mentioned, carry a second SD card. When it’s time to check, swap cards – take the full one home to review and pop the fresh one in. This minimizes the time you spend at the camera. Also, label your cards and try not to mix them between different camera brands. Occasionally, using the same card in different cameras can cause compatibility quirks. Keeping a pair of cards dedicated to each camera ensures smoother operation.
Check Battery and Card Status During Visits: When you do check the cam, note how many pictures/videos were taken and the remaining battery life. This helps judge if you need to adjust the sensitivity or delay (e.g., if you have 5,000 photos of nothing, maybe the sensitivity is too high or branches are triggering it). Also, scrolling through a few images on the spot can reveal if your framing stayed good (a storm might have shifted your aim, or growing foliage could start blocking the view). Small adjustments can be made on refresh visits if needed.
Internal Linking – Learn More: Interested in more wildlife gear tips? Check out our other guides on Ethologix, like our Best Budget Lenses for Wildlife Photography for capturing animals with regular camera. It’s packed with advice on photography equipment that pairs nicely with trail cam scouting. (By interlinking our relevant content, you’ll find all the info you need to elevate your wildlife watching game!)
Leverage Cellular Features (If Available): If you have a cellular trail camera, you can receive photos via email or app in near real-time. This is great for instant updates and means you can avoid physically visiting the camera often. Just be aware of data plan limits and battery usage (cell cams use more power for transmitting). Make sure you have good cell reception at the site for reliable operation.
Trail Camera Ethics: If you’re monitoring wildlife, especially in public reserves or parks, be mindful of regulations. Some areas have restrictions on baiting animals or on leaving cameras unattended. Always respect wildlife – the goal is to observe without influencing their behavior. Avoid placing cameras too close to nests or dens, which might disturb sensitive species.
By implementing these tips, you’ll improve your trail cam’s effectiveness and ensure you’re getting quality results while being a responsible wildlife observer

Frequently asked questions
About 3–4 feet (1–1.2m) off the ground works well for most animals. Go lower for small critters, higher for security.
Look for game trails, water sources, or feeding spots. Face it north if possible to avoid sun glare, and clear any branches from the view.
Use high resolution, multi-shot burst, and a moderate delay (10–30 sec). Adjust motion sensitivity based on how cluttered the area is.
Ideally every 1–3 weeks to avoid disturbing animals. Use two SD cards to swap quickly without downtime.
Common causes: moving branches, sun glare, or animals too fast/close. Clear vegetation, aim better, and test sensitivity.
Yes! Many use trail cams for driveways, backyards, or barns. Use “no-glow” models and mount them out of reach.
Typically weeks to months, depending on settings. Lithium batteries last longer, and videos drain more power.
Our latest posts